RSS구독하기:SUBSCRIBE TO RSS FEED
즐겨찾기추가:ADD FAVORITE
글쓰기:POST
관리자:ADMINISTRATOR

mWebView = (WebView) view.findViewById(R.id.webview); // 웹뷰 아무거나 붙혀서...


WebSettings webSettings = mWebView.getSettings();
webSettings.setJavaScriptEnabled(true);


CookieSyncManager.createInstance(mWebView.getContext());
CookieManager cookieManager = CookieManager.getInstance();
cookieManager.setAcceptCookie(true);
//cookieManager.removeSessionCookie(); // remove
cookieManager.removeAllCookie(); //remove
// Recommended "hack" with a delay between the removal and the installation of "Cookies"
SystemClock.sleep(1000);


cookieManager.setCookie("https://my.app.site.com/", "cookiename=" + value + "; path=/registration" + "; secure"); // ;
CookieSyncManager.getInstance().sync();


mWebView.loadUrl(sp.getString("url", "") + end_url);


    return view;
}
2015/10/16 16:30 2015/10/16 16:30
이 글에는 트랙백을 보낼 수 없습니다

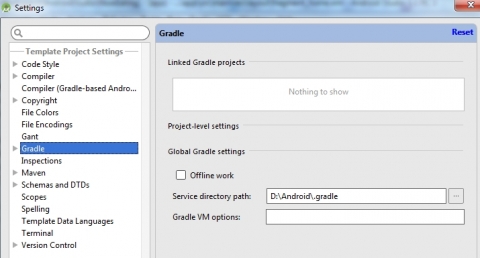
먼저 .gradle 폴더

사용자 삽입 이미지

  1. From Android Studio, go to File > Other Settings > Default Settings.
  2. Select Gradle.
  3. Change Service directory path to desired folder.
  4. Save the setting.

디폴드 값은 아래와 같다.

C drive (usually C:\Users\yourusername\.gradle)


Android Virtual Devices

사용자 삽입 이미지

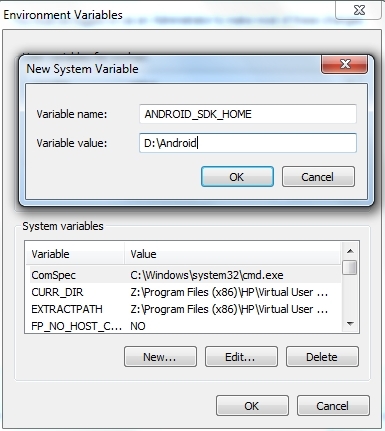
아래와 같이 화경변수 등한다.

  1. Close Android Studio if any.
  2. Move .android folder (usually at C:\Users\yourusername\.android) to destination drive (e.g. D:\Android)
  3. From Windows, go to Control Panel > System > Advanced system settings
  4. Go to Advanced tab > Environment Variables.
  5. Under System variables, click New... button.
  6. Type in the following:
    Variable name: ANDROID_SDK_HOME
    Variable value: D:\Android
  7. Click OK and OK again.

Cache Folder

사용자 삽입 이미지

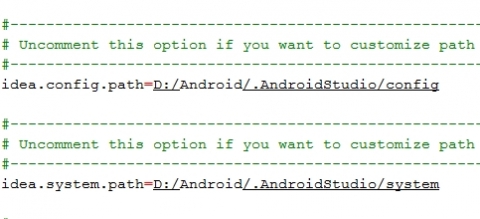
Our last step is to move presumably cache folder for AS. This involves editing a text file of AS to tell AS to refer to custom location for cache folder.

  1. Close AS if any.
  2. Move .AndroidStudio to destination drive (e.g. D:\Android)
  3. Go to the folder where AS is installed (e.g. C:\Program Files\Android Studio).
  4. Go to bin directory and edit idea.propertis file using your favourite text editor.
  5. Uncomment and edit the following two lines. Point them to new location:
    idea.config.path
    idea.system.path

행복한 안드로이드 프로그래밍이 되길 기원하다 ^__^;

2015/10/14 13:13 2015/10/14 13:13
이 글에는 트랙백을 보낼 수 없습니다
서버[centos][난 우분투가 더 좋은데 ㅠ] :


yum install svn;
난 1.8x 버젼으로 했다 ^^;;

adduser svn;
passwd svn;


svnadmin create --fs-type fsfs /home/svn/test_android;
chown svn.svn test_android/ -R;


자 이제 설정 파일 수정하자.
vi /home/svn/test_android/conf/authz;


[groups]
admin = comefeel
# harry_and_sally = harry,sally
# harry_sally_and_joe = harry,sally,&joe

[/]
lavi = rw
# &joe = r
# * =

[test_android:/]
@admin = rw
# * = r

자 이제 됐고....vi /home/svn/test_android/conf/passwd;

[users]
comefeel = 1234
lavi = 1234
vi /home/svn/test_android/conf/svnserve.conf

[general]
### These options control access to the repository for unauthenticated
### and authenticated users.  Valid values are "write", "read",
### and "none".  The sample settings below are the defaults.
anon-access = none
auth-access = write
### The password-db option controls the location of the password
### database file.  Unless you specify a path starting with a /,
### the file's location is relative to the directory containing
### this configuration file.
### If SASL is enabled (see below), this file will NOT be used.
### Uncomment the line below to use the default password file.
password-db = passwd
### The authz-db option controls the location of the authorization
### rules for path-based access control.  Unless you specify a path
### starting with a /, the file's location is relative to the the
### directory containing this file.  If you don't specify an
### authz-db, no path-based access control is done.
### Uncomment the line below to use the default authorization file.
authz-db = authz
### This option specifies the authentication realm of the repository.
### If two repositories have the same authentication realm, they should
### have the same password database, and vice versa.  The default realm
### is repository's uuid.
realm = test_android Repository


다수정 했으면 재시작 하자 .

killall svnserve;
svnserve -d -r /home/svn;
svn checkout svn://localhost/test_android;


SVN_EDITOR=/usr/bin/vim;
export SVN_EDITOR;
디렉토리 추가하고
svn mkdir svn://localhost/test_android/trunk
svn mkdir svn://localhost/test_android/branches
svn mkdir svn://localhost/test_android/tags
만들때마다 wq! 누르고
c 로 커밋해줘라 ^^

서버는 끝 ^^;

클라이언트 : 안드로이드ADT 에서 HELP -> new install ...... -> add ->
http://subclipse.tigris.org/update_1.8.x/ 추가 하자.
그럼 체크 박스 두개 나온다 다 check 및 finish;

open perspective  ~~~ button ~ 클릭하고 ~~


svn Repository Exploring 추가한다.

그럼 왼쪽 레파지토리에 마우스를 우측 눌러서
new 하고 레파지토리 클릭후 주소 svn://도메인/test_android
아까 썼던 아이디 comefeel 과 1234를 누르면
드디어 레파지토리에 뜬다!
체크 아웃하고 디렉토리 하나씩 몽땅 잡아서 올리자!
그리고 bin 파일 같은 -_- 것들은 제외 시켜야 올바르지 않겠는가?

올라간 레파지토리에서 직접 bin 디렉토리를 delete click 후에
해당 디렉토리 checkout 클릭한다.
그리고 이제 자바분류로 가서 해당 디렉토리 우측 버튼 누르면
add to svn:ignore.. 이 뜬다.
이버튼 누르면 이제 영영 bin은 업로드 안한다 ^^.


아 이거 쓰는데도 30분 걸리네 ㅡㅡ;; 간단하게 이미지 없이 한건데도...
여튼 정보 글쓰는 모든 블로거들은 존중받아야 된다.
난 제외한다.. 난 쓰레기니깐 .

svn  으로 팀워크를 잘해보자.


2014/02/10 23:06 2014/02/10 23:06
이 글에는 트랙백을 보낼 수 없습니다
proc : 프로시저
  • oracle
BEGIND 프로시저명(:name, :name2, :name3); END;
  • mssql
자동으로 prepare 적용 
  • mysqli (since mysql 5.0)
call proc_php_test(?, @out); 

select @out;
  • cubrid
select 1 into a from db_root;  -- output 변수 설정 

call proc_php_test(?, ?, ?, a);

select a from db_root; -- output 변수 출력

[편집] select : 조회

  • oracle
select * from 테이블;
  • mssql
select * from 테이블;
  • mysql
select * from 테이블;
set @age := 10;

select @name1 := name1, @name2 := name2 from 테이블 where age = @age;
  • mysqli
select * from 테이블;
  • postgres
select * from 테이블; 
  • cubrid
select * from 테이블;

[편집] insert : 입력

insert 구문을 DB에 따라 다르게 생성한다.

  • oracle
insert into 테이블 values (:name1, :name2, :name3);
  • mssql (자체 구현) - sp_executesql 을 사용하여 구현
insert into 테이블 values (@name1, @name2, @name3);
declare @sql nvarchar(1000)
declare @param nvarchar(1000)

set @sql = N'insert into 테이블 values (@name1, @name2, @name3) '
set @param = N'@name1 varchar(30), @name2 varchar(30), @name3 varchar(30)'

exec sp_executesql @sql, @param, @name1 = '안녕', @name2 = '하세요', @name3 = '호박'
declare @name1 varchar(30) 
declare @name2 varchar(30)
declare @name3 varchar(30)

set @name1 = '안녕'
set @name2 = '하세요'
set @name3 = '호박'

insert into 테이블 values (@name1, @name2, @name3);
  • mysql (자체 구현)
set @name1 := '안녕';
set @name2 := '하세요';
set @name3 := '호박';

insert into 테이블 values (@name1, @name2, @name3);
  • mysqli (mysql은 지원하지 않음)
insert into 테이블 values (?, ?, ?);
  • postgres
insert into 테이블 values ($1, $2);
  • cubrid
insert into 테이블 values (?, ?);

[편집] delete

  • oracle
delete from 테이블 where name = :value or name = :value2;
  • mssql (자체 구현) - sp_executesql 을 사용해서 구현
delete from 테이블 where name = @name1 or name = @name2;
declare @sql nvarchar(1000)
declare @param nvarchar(1000)

set @sql = N'delete from 테이블 where name = @name1 or name = @name2; '
set @param = N'@name1 varchar(30), @name2 varchar(30)'

exec sp_executesql @sql, @param, @name1 = '안녕', @name2 = '하세요'
  • mysql (자체 구현)
set @name1 := '안녕';
set @name2 := '하세요';

delete from 테이블 where name = @name1 or name = @name2;
  • mysqli (mysql은 지원하지 않음)
delete from 테이블 where name = ? or name = ?;
  • postgres
delete from 테이블 where name = $1 or name = $2;
  • cubrid
delete from 테이블 where name = ? or name = ?;

[편집] update

  • oracle
update 테이블 set name = :value where name2 = :value2 or name2 = :value3;
  • mssql (자체 구현) - sp_executesql 을 사용하여 구현
update 테이블 set name = @name1 where name2 = @name2 or name2 = @name3;
declare @sql nvarchar(1000)
declare @param nvarchar(1000)

set @sql = N'update 테이블 set name = @name1 where name2 = @name2 or name2 = @name3;'
set @param = N'@name1 varchar(30), @name2 varchar(30), @name3 varchar(30)'

exec sp_executesql @sql, @param, @name1 = '안녕', @name2 = '하세요', @name3 = '메롱'


  • mysql (자체 구현)
set @name1 := '안녕';
set @name2 := '하세요';
set @name3 := '메롱';

update 테이블 set name = @name1 where name2 = @name2 or name2 = @name3;
  • mysqli (mysql 지원하지 않음)
update 테이블 set name = ? where name2 = ? or name2 = ?;
  • postgres
update 테이블 set name = $1 where name2 = $2 or name2 = $3;
  • cubrid
update 테이블 set name = ? where name2 = ? or name2 = ?;
2010/02/22 23:49 2010/02/22 23:49
이 글에는 트랙백을 보낼 수 없습니다
Visual Basic, ASP, VB.NET에서 ADO, ADO.NET을 이용한 Database 프로그램을 개발하는 경우 프로그램내에 SQL 구문을 문자열로 연결한 후 실행하도록 구성한 코드를 많이 보게 된다.

이러한 코드 구성을 일반적으로 '동적 쿼리', '하드 코딩된 쿼리'라 부른다.

예를 들어 비주얼 베이직의 경우

Dim strSQL As String

strSQL="select orderid, orderdate, employeeid from orders"
strSQL=strSQL+" where orderid=" & txtOrderID

cnn.Execute strSQL

하지만 이같은 동적 쿼리는 가능한 사용하지 않는 것이 좋다. 대신 SQL Server의 저장 프로시저를 이용해 처리 용량과 응답 속도의 향상 및 유지 보수 등 저장 프로시저의 특징을 활용하는 것이 좋다.

하지만 설계상의 문제나 또는 고객의 다양한 요구 구현 방법상의 이질적 문제로 인해 동적 쿼리를 써야하는 상황이 자주 발생한다. Q/A의 질문 유형 중에도 이같은 동적 쿼리 작성법에 관한 내용이 상당수를 차지하고 있다.

저 장 프로시저를 통해 코드를 구성하더라도 저장 프로시저 내에서 다시 동적 쿼리를 사용하게 되는 경우가 발생한다. 온라인 설명서에는 이를 '런타임 시 명령문 작성'이라는 주제로 설명했다. 이 경우 SQL Server에서는 sp_executesql, exec()의 두가지 명령을 사용할 수 있다.

클라이언트나 서버 사이드에서 동적 쿼리를 사용해야 하는 상황이 되었을 때, 다시말해 저장 프로시저를 직접 사용할 수 없는 상황에서는 또 다른 해결 방법을 이용할 수 있다.
아래 두 가지 상황에서의 해결 방법이다.

클라인트 사이드에서 동적 쿼리가 필요한 경우

ADO, ADO.NET에서는 파라미터를 가진 동적 쿼리를 지정할 수 있으며 일반적으로 아래와 코드 구성을 가진다.

1. ADO, ODBC, Command 오브젝트 연동
Dim strSQL As String

strSQL="select orderid, orderdate, employeeid from orders"
strSQL=strSQL+" where orderid = ?"

2. ADO.NET, SqlClient 네임스페이스, SqlCommand 오브젝트와 연동
Dim strSQL As String

strSQL="select orderid, orderdate, employeeid from orders"
strSQL=strSQL+" where orderid = @orderid"

위 에 코드를 실행하면 실제 SQL Server에서는 sp_executesql 시스템 프로시저를 통해서 실행이 된다. 특히 ADO.NET의 경우는 디자인 타임에 'SqlDataAdapter Configuration Wizard'를 사용하면 위와 같은 코드를 작성해 준다.

SQL Server, 저장 프로시저에서 동적 쿼리가 필요한 경우
exec() 아니라 sp_executesql 시스템 프로시저를 이용한다.

결 국 클라이언트 사이드건 서버 사이드건 sp_executesql이 사용된 것을 알 수 있다. exec()를 쓴 경우와 sp_executesql를 사용한 경우의 성능과 SQL Server의 Cache 매니저의 상황 비교에 대한 내용을 마지막에 추가해 두었다.

일반적으로 sp_executesql은 exec()비해 몇 가지 장점을 제공한다.

1. 쿼리문안에 매개변수(입력/출력)를 정의할 수 있다.
2. 매개변수 사용으로 인해 쿼리 최적화 프로그램이 컴파일된 실행 플랜을 재 사용할 확률이 높아진다.

실제로 exec()와 sp_executesql은 Cache 매니저의 처리 방법 및 활동 상태가 다르다는 것을 마지막에 추가한 성능 모니터링을 통해서 알 수가 있을 것이다.

이번 기회의 sp_executesql 시스템 프로시저 다양한 사용법과 관련 지식을 얻는데 미력하나마 도움이 됐으면 한다. 그럼, 구문부터 살펴보자.

sp_executesql [@stmt =] stmt
[
{, [@params =] N'@parameter_name data_type [,...n]' }
{, [@param1 =] 'value1' [,...n] }
]

인수설명
@stmt: T-SQL문 또는 배치 명령. ntext 형으로 변환될 수 있는 변수 또는 유니코드 상수 문자열. 내부에 @name 형식의 파라미터를 포함할 수 있다.
@params: @stmt에 포함된 모든 파라미터의 이름과 데이터 타입을 정의한다.
@param1: @params 파라미터에서 첫번째 파라미터에 할당할 값
n : 각 파라미터에 대한 값을 할당한다.

참고
UNICODE 문자열 상수를 지정할 때는 N'...'형식을 사용한다.sp_executesql 프로시저에 선언됐던 파라미터가 ntext형이기 때문에 문자열을 직접 지정할 때는 위와 같은 형태를 사용하면 된다.

sp_executesql은 sql로 구성된 시스템 프로시저가 아니라 확장 프로시저이다.

기본 예제
1. TOP 절의 값을 동적으로 지정하고자 하는 경우(아래 구문은 set rowcount n 세션 옵션으로 대치할 수도 있다)

declare @cnt as nvarchar(5)
declare @stmt as nvarchar(100)
set @cnt = '5'
set @stmt = 'select top ' + @cnt + ' * from northwind.dbo.orders'

exec sp_executesql @stmt

아래 예제는 단순히 SQL을 동적으로 작성하고자 하는 경우로 @db의 값이 실행 시마다
다른 데이터베이스명이 올 수 있다고 가정한다. 테이블명은 동일한다.

declare @db as nvarchar(20)
declare @stmt as nvarchar(100)
set @db = 'northwind'
set @stmt = 'select * from '+ @db +'.dbo.orders'

exec sp_executesql @stmt

2. 하나 이상의 명령을 배치로 실행

declare @stmt as nvarchar(500)
set @stmt = 'use northwind; '
set @stmt = @stmt + 'select top 5 * from dbo.orders where
orderid=10248; '
set @stmt = @stmt + 'select top 5 * from dbo.[order details] where
orderid=10248'

exec sp_executesql @stmt

입력 파라미터를 적용한 예제

1. @orderid 입력 파라미터를 이용해 해당 주문 번호를 가진 [order details] 테이블의 주문 제품 정보를 출력

use northwind

declare @stmt as nvarchar(100)
declare @params as nvarchar(100)
set @stmt = 'select productid, quantity, unitprice from '
set @stmt = @stmt + 'dbo.[order details] where orderid=@orderid'
set @params = '@orderid int'

exec sp_executesql @stmt, @params, @orderid=10248

2. 위 예제를 저장 프로시저 안에서 연동한 경우

use northwind

create proc upOrderDetailsSel
@porderid int
as
declare @stmt as nvarchar(100)
declare @params as nvarchar(100)
set @stmt = 'select productid, quantity, unitprice from '
set @stmt = @stmt + 'dbo.[order details] where orderid=@orderid'
set @params = '@orderid int'

exec sp_executesql @stmt, @params, @orderid=@porderid
go
exec upOrderDetailsSel @porderid = 10248

input 파라미터를 적용한 예제

1. @table을 입력 파라미터를 이용해서 실제 입력할 대상 테이블을 결정 입력될 컬럼값들 또한 입력 파라미터로 처리한 예제

-- 아래 테스트용 테이블을 우선 작성할 것.
create table northwind.dbo.table1 (a int, b int, c int)

use northwind

declare @table as nvarchar(20)
declare @stmt as nvarchar(100)
declare @params as nvarchar(100)

set @table = 'dbo.table1'
set @stmt = 'insert into ' + @table + ' '
set @stmt = @stmt + 'values (@a, @b, @c)'
set @params = '@a int, @b int, @c int'

exec sp_executesql @stmt, @params, @a=1, @b=2, @c=3

확인

select * from table1

2 .output 파라미터를 적용한 예제

동적 SQL문 내에도 출력(OUTPUT) 파라미터를 선언하고 결과 값을 리턴 받을 수 있다. 저장 프로시저에서 출력 파라미터를 사용하는 것과 동일하게, 선언부와 호출부에 반드시 OUTPUT 키워드를 지정한다.

use northwind

declare @stmt as nvarchar(100)
declare @params as nvarchar(100)
declare @orderret as int

set @stmt = 'select @ordercnt = count(*) from dbo.orders'
set @params = '@ordercnt as int OUTPUT' -- OUTPUT 키워드에 주의

여기도 OUTPUT 키워드를 지정한다.

exec sp_executesql @stmt, @params, @ordercnt = @orderret OUTPUT

확인

select @orderret

지원이 안되는 것들은 다음과 같다

*. sp_executesql은 배치, 저장 프로시저, 트리거처럼 한 배치로 실행된다.

1.동적 SQL문에서는 RETURN 문을 사용할 수 없다

2.로컬 변수를 액세스 할 수 없다

declare @chr char(3)
set @chr = 'abc'

sp_executesql N'PRINT @CharVariable'
GO

3. 현재 데이터베이스가 변경되지 않는다
use pubs
go
sp_executesql N'use northwind'
select * from shippers -- shippers 테이블은 northwind에 있다.
go

전문 개발자및 관리자를 위한 추가 정보

성능 비교
만일, 여러분이 Windows NT/2000의 성능 모니터의 사용법을 알고 있다면 아래 3가지 사용 예에 대한 모니터를 수행하고 각각 Cache Manager상의 활동이 어떻게 다른지를 비교 해 보면 많은 도움이 될 것이다.

아래에 성능 모니터에 모니터링할 관련 오브젝트 및 카운트을 적어 뒀다.

성능 개체
SQL Server:Cache Manager
- 모든 카운터
- 다음 목록에서 인스턴스 선택
_Total
Adhoc Sql Plans
Execution Context
Procedure Plans
기타... (관심이 있다면)

참고
3개의 방법을 개별적으로 테스트할 때, Procedure Cache상에 동일한 플랜이 재 사용되는 것을 방지하기 위해

DBCC FREEPROCCACHE

명 령을 사용할 수 있다. 이 명령은 프로시저 캐시에서 모든 요소를 제거한다. 이 작업을 수행해야 Cache Object Counter가 늘어나는 것을 볼 수 있다. 그리고 현재 Cache된 Object에 대한 정보를 보고자 하는 경우 아래의 쿼리를 이용하면 된다.

select * from master..syscacheobjects
where dbid = db_id('northwind')

1. 저장 프로시저 테스트용
DROP PROC dbo.upOrderDetailsQuery
CREATE PROC dbo.upOrderDetailsQuery
@orderid int
AS
select productid, quantity, unitprice from dbo.[order details]
where orderid = @orderid
go
EXEC dbo.upOrderDetailsQuery @orderid = 10248

2. sp_executesql

USE Northwind

declare @stmt as nvarchar(100)
declare @params as nvarchar(100)
set @stmt = 'select productid, quantity, unitprice from '
set @stmt = @stmt + 'dbo.[order details] where orderid=@orderid'
set @params = '@orderid int'

exec sp_executesql @stmt, @params, @orderid=10248
go

3. EXEC() 사용

USE Northwind

declare @stmt as nvarchar(100)
declare @orderid varchar(10)
set @orderid = '10248'
set @stmt = 'select productid, quantity, unitprice from '
set @stmt = @stmt + 'dbo.[order details] where orderid = '+ @orderid

EXEC (@stmt)
2010/02/22 23:12 2010/02/22 23:12
이 글에는 트랙백을 보낼 수 없습니다

매번 까먹고 까먹는 주석 -_-
프로젝트가 끝나는 시점에 주석과의 싸움은 언제나 있는데 ..
항상 까먹는다 -_-;;


Window -> Preferences -> Java -> Code Style -> Code Templates -> Comments 에서


파일정보 주석 (소스 가장 위 상단을 선택)

Types -> Edit

/**
 * @FileName  : ${file_name}
 * @Project     : ${project_name}
 * @Date         : ${date}
 * @작성자      : ${user}

 * @변경이력 :
 * @프로그램 설명 :
 */


메소드정보 주석 (원하는 함수를 선택)

Methods -> Edit

/**
 * @Method Name  : ${enclosing_method}
 * @작성일   : ${date}
 * @작성자   : ${user}
 * @변경이력  :
 * @Method 설명 :
 * ${tags}
 */


${} 내용설명

data : Current date (현재 날짜)

dollar : The dollar symbol (달러문양)

enclosing_type :The type enclosing the method (선택된 메소드의 타입)

file_name : Name of the enclosing compilation (선택된 편집파일 이름)

package_name : Name of the enclosing package (선택된 패키지 이름)

project_name : Name of the enclosing project (선택된 프로젝트 이름)

tags : Generated Javadoc tags (@param, @return...) (Javedoc 태그 생성)

time : Current time (현재 시간)

todo : Todo task tag ('해야할일'태그 생성)

type_name : Name of the current type (현재 타입의 이름)

user : User name (사용자 이름)

year : Current year (현재 연도)


3.2 기준으로 주석입력 단축키는 ALT + SHIFT + J

2010/02/11 15:58 2010/02/11 15:58
이 글에는 트랙백을 보낼 수 없습니다


< 원인 >

형상관리 이력정보가 꼬이는 경우가 있음.


< 해결 >

1-1. 해당 프로젝트를 선택하고 우클릭 > team > cleanup 실행

1-2. cleanup 성공 후 다시 업데이트


클린업 도중 에러가 발생하거나 위 방법으로 해결이 안되면 다음과 같이 처리

2-1. 탐색기에서 콘솔로그에 출력된 폴더 내에 있는 .svn 폴더로 이동


2-2. 폴더 내에 locked 파일이 있으면 삭제

2-3. 이클립스에서 다시 업데이트

2010/02/01 16:02 2010/02/01 16:02
이 글에는 트랙백을 보낼 수 없습니다

JSP & PHP with EASE

by Ahmad Baitalmal
published on: 07/05/2006


Inter-mingling JSP and PHP code inside EASE is extremely simple. You can use JSP/PHP code inside your EASE script to leverage any existing code you might already have or extent the platform with third party libraries and capabilities.

The Etelos Application Server platform allows you to drop in and out of PHP/JSP code seamlessly. Below is an example of how you can access any EAS binder variable.

< #[SYSTEM.DATE_TIME]#> <
br>
<?php
print eas_get_value( "system.date_time" ) ."<br>";
?>

<?jsp

<%= eas_get_value("system.date_time") "<br/>"%>

?>


The three lines in the code above will produce identical output. You have full un-crippled access to PHP & JSP. You can interact with EAS data in real-time and see your changes on the fly. The following code creates a new binder tag in PHP  and prints it out in EASE.

<?php
print eas_set_value( "my.data", "right here" );
?>

My data is <b></b><br>

As expected, the output is:

My data is right here

Or in JSP:
<?jsp
<% eas_set_value( "my.data", "right here" )%>
?>

My data is <b>< #[MY.DATA]#></b><br>

EASE skips much of the grunt work usually required in web development. With the PHP/JSP interfaces, you can still do all the fine-grained coding that you may need. For example, you may need to update a few binder instances real quick without user interaction. While eas_set_value and eas_get_value give you access to the EAS tag data in real-time, after the page execution is done, your changes aren't saved to the database. Here is how you modify the actual data in contacts and instances in PHP:

<?php
eas_set_instance_value( "products.6", "color", "Tomato");
eas_set_contact_value( eas_get_value("contact.id"), "age", "33");
?>

< # apply instance products.6 and reference as "product". # >
The product color is < #[product.color]# >
<br>

The instance's color variable is changed in the database to "Tomato" and the < # [contact.id] # >'s age variable is changed to "33". In the opposite direction, you can load an instance or contact from the database like this:

<?php
print_r( eas_get_instance( "products.6" ) );
print_r( eas_get_contact( eas_get_value("contact.id") ) );
?>


This code will print two arrays. The first array is an associative array of variable=>value for instance id 6 from the products binder. The next array is also an associative array of variable=>value for the < # [contact.id] # >.

The following code goes a little bit further. eas_query enables you to write your own SQL queries to the database.
<?php
$result = eas_query( "select * from binder_12 where lower( color ) != 'red';" );
if( $result->ok )
{
    print "<u>". $result->count ."</u> products were found\n";    
    print "<u>". $result->updated ."</u> products were updated\n";    
    while( $product = pg_fetch_assoc($result->recordset) )
    {
        print "<b>". $product['instance_id'] . " - " . $product['name'] . "</b>\n";
        print $product['color'] ."\n";
        print $product['description'] ."\n\n";
    }
}
?>


In this example, a query is issued to return all products (binder_12) where the color is not red. The result object that is returned provides a few useful properties.

$result->ok is true when the query is executed successfully, otherwise it's false. $result->count has the number of rows returned, and $result->updated has the number of rows that were updated if the query was an UPDATE.


Here is the same code in JSP:
<?jsp

<%
   try
   {
       ResultSet rs = eas_query( "select * from binder_12;" );
       Statement st = rs.getStatement();
             rs.last();
       int count = rs.getRow();
       rs.beforeFirst();
             int updateCount = st.getUpdateCount();
%>
       <%="<u>" count "</u> products were found<br/>"%>
       <%="<u>" updateCount "</u> products were updated<br/>"%>
<%
       while( rs.next() )
       {
%>
           <%="<b>" rs.getString( "instance_id" ) "-" rs.getString( "name" )
               "</b><br/>"%>
           <%=rs.getString( "color" ) "<br/>"%>
           <%=rs.getString( "description" ) "<br/><br/>"%>
<%
       }          st.close();
   }
   catch( Exception e ) {}
%>

?>


You can easily imagine doing some more advanced queries that would be hard or inefficient to do in the standard list engine like unions or intersects. Having the full power and flexibility of PHP and JSP is also a big plus, you have the speed of rapid web application development with EASE and the flexibility and extensibility of PHP and JSP all in a single page.


//  This following example is not featured int he magazine because of space in the printed edition.  Here is an extra example of setting contact values in JSP.

<?jsp
<%@ page import="java.util.*" %>

<%=eas_set_contact_value( "2330c69b9fab0cfe170fad0a95e8f7f8", "last_name", "Changed!" )%>

<%
   Map m = eas_get_contact( "2330c69b9fab0cfe170fad0a95e8f7f8" );
   Iterator i = m.keySet().iterator();
   String result = "";
   while( i.hasNext() )
   {
       Object key = i.next();
       Object val  = m.get( key );
             result = key.toString() ":" val.toString() "<br/>";
   }
%>

<%="<br/><br/>result:<br/>" result%>

?>


Relevent Tags: EASE tips   PHP Dev   JSP Dev   

2009/11/10 11:51 2009/11/10 11:51
이 글에는 트랙백을 보낼 수 없습니다

ESftp 라는게 Eclipse와 연동되는 FTP plug in으로 유용한 기능을 지니고 있었으나

Eclipse 3.2로 업그레이드 되면서 실행이 되지 않았습니다.

그러나 드디어 200711월 말 패치로 3.2버전에서도 실행이 가능하군요.


먼저 첨부한 jar 파일을 Eclipse 폴더의 plugin 폴더에 복사해서 넣으시면 메뉴가
생깁니다.


연결하고자 하는 프로젝트를 선택하여 우 클릭하여
 Properties를 선택하면 ESftp라는 메뉴가 생겼습니다.


선택하시면
간단한 메뉴가 나옵니다.


Protocol
FTP로 설정 Test settings을 하면 Eclipse가 뻗어버리는


현상이 생기므로 ProtocalSFTP 바꿔주시는게 좋습니다.


그리고 프로젝트 하위와 FTP root가 일치한다면 Site Root 옵션에 ‘/’하나 써주시면 되겠습니다.


그리고 Test settings를 클릭하면
이렇게 성공했다는 메시지가 나타나면 성공입니다.


.java
파일의 경우 컴파일된 클래스를 우클릭하면 위와 같은 메뉴를 통해 서버에 전송할 수 있고


보시는 바와 같이 단축키는 Ctrl+Alt+P 입니다.


전송을 실행하면


Eclipse Console
에 메시지가 뜨면 전송이 잘된 것 입니다.


확인해 보세요.


이제 Eclipse로 클래스파일 작업 후 타 FTP 프로그램이나 Application을 사용하는


불편함이 줄어들겠죠.


그럼 도움이 되시길 바랍니다.


2009/03/13 14:49 2009/03/13 14:49
이 글에는 트랙백을 보낼 수 없습니다
이클립스를 위주로 개발을 하지만 아직도 가끔 에딧플러스를 이용하는데요.
 
제경우 가장큰 이유중 하나가 이클립스에서 자동 줄바꿈이 되지않아서 입니다.
 
html같은 부분을 편집할때보면 가로로 줄이 긴경우 무척이나 불편하더군요
 
오늘 작정하고 구글검색을 해서 찾아봤습니다.
이곳인데요.
영어가 짧아서 정확히 무슨소리인지는 알수없지만 아직 버그가 좀 있다고 하는말
같아요 -_-;;
 
설치 방법은 나와 있는 방법그대로 하시면 됩니다.
 

How to install?

  1. Open Eclipse
  2. Help > Software Updates > Find and Install
  3. Search for New Features to Install
  4. New Remote Site
  5. Enter the url - http://ahtik.com/eclipse-update/
  6. Install and Enjoy
위순서대로 하신후에 이클립스를 재시작합니다
그리고 문서를 하나 열어봅니다


위소스는 네이버 메인화면 소스입니다. 보시는 바와 같이 가로 스크롤이 길게 생겨있네요.
문서에 대고 오른쪽 클릭을 하면 virtual Word Wrap 이란메뉴가 있습니다.
이메뉴를 클릭해주시면 됩니다


보시는 바와 같이 가로 스크롤이 없어졌네요^^
같은 한줄로 되어있던부분은 같은 백그라운드 칼라로 하이라이트 되어있습니다.~
 
오늘 오후에 설치를 해보았기 때문에 현재까진 특별한 버그는 발견하지 못했습니다.
그리고 문제시 삭제하는 방법은
 
 
Help > Software Updates > Manage Configuration 선택
WordWrap Feature 를 disable시킨담에 uninstall하시면 됩니다~


BR />
Flex Builder3 에서도 됩니다 ㅎㅎ
2009/03/13 14:40 2009/03/13 14:40
이 글에는 트랙백을 보낼 수 없습니다
웅쓰:웅자의 상상플러스
웅자의 상상플러스
전체 (379)
게임 (5)
영화 (2)
기타 (23)
맛집 (5)
영어 (2)
대수학 (3)
형태소 (5)
Hacking (9)
Linux (112)
HTML (48)
Application_developing (48)
Web_developing (102)
Window (11)
«   2024/12   »
1 2 3 4 5 6 7
8 9 10 11 12 13 14
15 16 17 18 19 20 21
22 23 24 25 26 27 28
29 30 31        
  1. 2016/01 (1)
  2. 2015/12 (3)
  3. 2015/10 (3)
  4. 2015/03 (2)
  5. 2015/01 (4)