먼저 .gradle 폴더
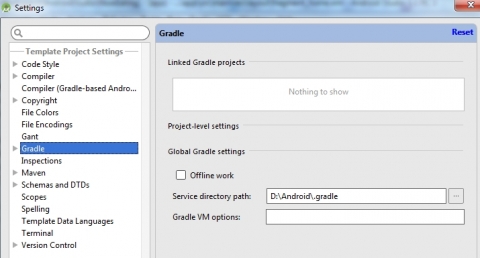
- From Android Studio, go to File > Other Settings > Default Settings.
- Select Gradle.
- Change Service directory path to desired folder.
- Save the setting.
디폴드 값은 아래와 같다.
C drive (usually C:\Users\yourusername\.gradle)
Android Virtual Devices
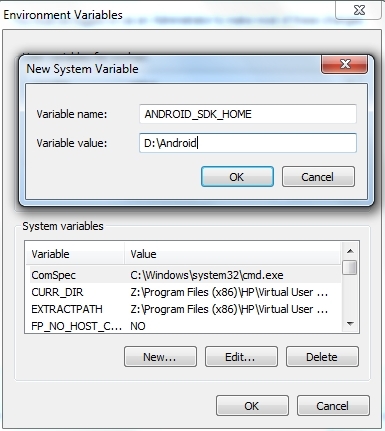
아래와 같이 화경변수 등한다.
- Close Android Studio if any.
- Move .android folder (usually at C:\Users\yourusername\.android) to destination drive (e.g. D:\Android)
- From Windows, go to Control Panel > System > Advanced system settings
- Go to Advanced tab > Environment Variables.
- Under System variables, click New... button.
- Type in the following:
Variable name: ANDROID_SDK_HOME
Variable value: D:\Android - Click OK and OK again.
Cache Folder
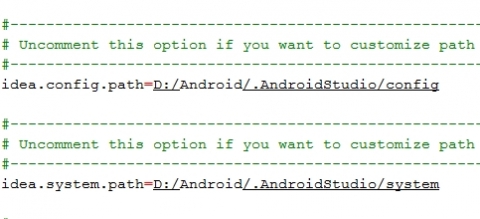
Our last step is to move presumably cache folder for AS. This involves editing a text file of AS to tell AS to refer to custom location for cache folder.
- Close AS if any.
- Move .AndroidStudio to destination drive (e.g. D:\Android)
- Go to the folder where AS is installed (e.g. C:\Program Files\Android Studio).
- Go to bin directory and edit idea.propertis file using your favourite text editor.
- Uncomment and edit the following two lines. Point them to new location:
idea.config.path
idea.system.path
행복한 안드로이드 프로그래밍이 되길 기원하다 ^__^;

이 글에는 트랙백을 보낼 수 없습니다

0