RSS구독하기:SUBSCRIBE TO RSS FEED
즐겨찾기추가:ADD FAVORITE
글쓰기:POST
관리자:ADMINISTRATOR


1. Cocoapods 는 OS X 혹은 iOS 앱을 개발할때 사용되는 라이브러리 관리를 도와주는 Android 의 Maven 같은 도구입니다.

2. CocoaPods 를 사용하기 위해서는 Ruby gem 이 필요함. 맥에는 Ruby가 내장되어있지만 rbenv를 설치하여 ruby 버전과 gem을 관리할수 있습니다.

3. 맥 OS X 에서의 루비 관리.

맥에서는 Homebrew 패키지 매니저를 이용하면 rbenvruby-build를 쉽게 설치할 수 있다.

Homebrew는 한줄의 명령어로 설치 가능한데 해당 명령어는 계속 변경되기 때문에 문서에 언급하지 않는다. http://brew.sh 하단의 Install Homebrew를 참고하기 바란다.

Homebrew를 이용한 rbenv, ruby-build 설치 방법

$ brew update
$ brew install rbenv ruby-build


--- 신형 Mac OS는 루비가 기본 설치가 되어있어서 위에것 패스 ---


4.  Ruby 설치를 끝낸 후 gem을 사용해서 cocoaPods 를 설치.
$ # cocoapods 설치
$ sudo gem install cocoapods
$ # 라이브러리 spec을 불러옴
$ pod setup


5.  작업 프레임워크에 Podfile 을 생성.

$ # 작업 프로젝트 폴더로 이동
$ # Podfile 파일 생성
$ cat >> Podfile
platform :ios, '8.0'
use_frameworks!
pod 'Alamofire', '~> 3.0'
^C


6.  또는 'pod init'로 Podfile 파일 을 자동생성할수 있다.

     여튼 완료되었으면 아래의 명령어를 통해서 Podfile 설정에 등록된

라이브러리를 자동설치 후 프로젝트 실행.
     - 끝 -
$ pod install 
$ open 프로젝트.xcworkspace


-.  혹시 설정을 잘못해서 pod Install 이 된경우에는 설정을 고친뒤 6번 실행 후 아래의 경로의 디렉토리를 강제삭제 시킨 후 다시 빌드 하면 OK.
^_^
$ cd ~/Library/Developer/Xcode/DerivedData 
$ rm -rf 프로젝트-랜덤문자(zoofewstllzmbhjhrdzwtfegkzz)
2015/12/31 12:28 2015/12/31 12:28
이 글에는 트랙백을 보낼 수 없습니다

mWebView = (WebView) view.findViewById(R.id.webview); // 웹뷰 아무거나 붙혀서...


WebSettings webSettings = mWebView.getSettings();
webSettings.setJavaScriptEnabled(true);


CookieSyncManager.createInstance(mWebView.getContext());
CookieManager cookieManager = CookieManager.getInstance();
cookieManager.setAcceptCookie(true);
//cookieManager.removeSessionCookie(); // remove
cookieManager.removeAllCookie(); //remove
// Recommended "hack" with a delay between the removal and the installation of "Cookies"
SystemClock.sleep(1000);


cookieManager.setCookie("https://my.app.site.com/", "cookiename=" + value + "; path=/registration" + "; secure"); // ;
CookieSyncManager.getInstance().sync();


mWebView.loadUrl(sp.getString("url", "") + end_url);


    return view;
}
2015/10/16 16:30 2015/10/16 16:30
이 글에는 트랙백을 보낼 수 없습니다

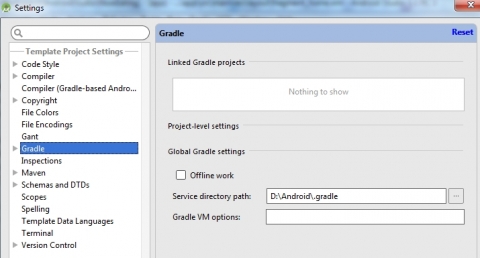
먼저 .gradle 폴더

사용자 삽입 이미지

  1. From Android Studio, go to File > Other Settings > Default Settings.
  2. Select Gradle.
  3. Change Service directory path to desired folder.
  4. Save the setting.

디폴드 값은 아래와 같다.

C drive (usually C:\Users\yourusername\.gradle)


Android Virtual Devices

사용자 삽입 이미지

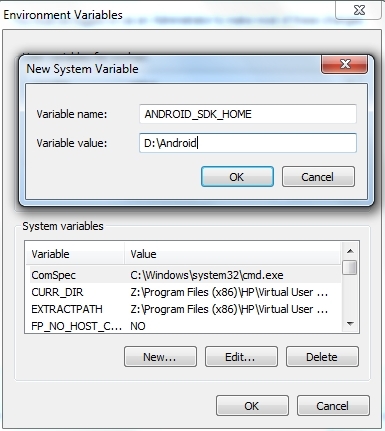
아래와 같이 화경변수 등한다.

  1. Close Android Studio if any.
  2. Move .android folder (usually at C:\Users\yourusername\.android) to destination drive (e.g. D:\Android)
  3. From Windows, go to Control Panel > System > Advanced system settings
  4. Go to Advanced tab > Environment Variables.
  5. Under System variables, click New... button.
  6. Type in the following:
    Variable name: ANDROID_SDK_HOME
    Variable value: D:\Android
  7. Click OK and OK again.

Cache Folder

사용자 삽입 이미지

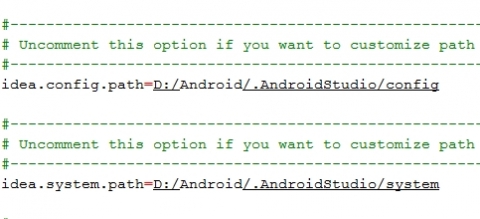
Our last step is to move presumably cache folder for AS. This involves editing a text file of AS to tell AS to refer to custom location for cache folder.

  1. Close AS if any.
  2. Move .AndroidStudio to destination drive (e.g. D:\Android)
  3. Go to the folder where AS is installed (e.g. C:\Program Files\Android Studio).
  4. Go to bin directory and edit idea.propertis file using your favourite text editor.
  5. Uncomment and edit the following two lines. Point them to new location:
    idea.config.path
    idea.system.path

행복한 안드로이드 프로그래밍이 되길 기원하다 ^__^;

2015/10/14 13:13 2015/10/14 13:13
이 글에는 트랙백을 보낼 수 없습니다
우선 xcode는 git에 최적하다 ㅠ;;

왠만하면 github 를 쓰는걸 추천한다.

일단 xcode 5.02 를 깔면 자동으로 svn 1.7이상이 깔린다.

우리가 개발하는 해당 디레토리가 iphone 이라면

iphone 최상단에 .git 디렉토리가 있는데 그거 삭제해준다 ㅡㅡ;

그리고

svn import -m "iPhone first attack" iphone/ svn://lavipons.igearmall.biz/(svn 레파지토리) --force-log


그리고 svn update; 을 해주고 Xcode 에 들어간다.


preferences 에 accounts 들어가서.

+ 버튼 누르고 계정다 입력한후에 ON 시킨다.

xcode 를 재시작하고 해당디렉토리 우측 버튼 클릭후

소스 콘트롤에 업데이트 해주면 완성 .. ㄷㄷㄷ 엄청 쉽다...

그리고 나서 ㅠㅠ 터미널로 다시 들어가서

SVN_EDITOR=/usr/bin/vim;
export SVN_EDITOR;

하고 프로젝트 디렉토리 최상단에서 svn commit 누른다.

그리고 wq! 한뒤


c 로 커밋 ㅠㅠ;;;;;;

수동이다 ㅠㅠ;

자동을 찾아보았는데 안된다 ㅠㅠ

하는법좀 알려주라 ㅠㅠ


다시 지우고 update 받고 Xcode 에서 커밋 하니깐 잘되네여;;

찾아보니 5.01 버그라네여 ㅠㅠ
2014/02/10 23:24 2014/02/10 23:24
이 글에는 트랙백을 보낼 수 없습니다
서버[centos][난 우분투가 더 좋은데 ㅠ] :


yum install svn;
난 1.8x 버젼으로 했다 ^^;;

adduser svn;
passwd svn;


svnadmin create --fs-type fsfs /home/svn/test_android;
chown svn.svn test_android/ -R;


자 이제 설정 파일 수정하자.
vi /home/svn/test_android/conf/authz;


[groups]
admin = comefeel
# harry_and_sally = harry,sally
# harry_sally_and_joe = harry,sally,&joe

[/]
lavi = rw
# &joe = r
# * =

[test_android:/]
@admin = rw
# * = r

자 이제 됐고....vi /home/svn/test_android/conf/passwd;

[users]
comefeel = 1234
lavi = 1234
vi /home/svn/test_android/conf/svnserve.conf

[general]
### These options control access to the repository for unauthenticated
### and authenticated users.  Valid values are "write", "read",
### and "none".  The sample settings below are the defaults.
anon-access = none
auth-access = write
### The password-db option controls the location of the password
### database file.  Unless you specify a path starting with a /,
### the file's location is relative to the directory containing
### this configuration file.
### If SASL is enabled (see below), this file will NOT be used.
### Uncomment the line below to use the default password file.
password-db = passwd
### The authz-db option controls the location of the authorization
### rules for path-based access control.  Unless you specify a path
### starting with a /, the file's location is relative to the the
### directory containing this file.  If you don't specify an
### authz-db, no path-based access control is done.
### Uncomment the line below to use the default authorization file.
authz-db = authz
### This option specifies the authentication realm of the repository.
### If two repositories have the same authentication realm, they should
### have the same password database, and vice versa.  The default realm
### is repository's uuid.
realm = test_android Repository


다수정 했으면 재시작 하자 .

killall svnserve;
svnserve -d -r /home/svn;
svn checkout svn://localhost/test_android;


SVN_EDITOR=/usr/bin/vim;
export SVN_EDITOR;
디렉토리 추가하고
svn mkdir svn://localhost/test_android/trunk
svn mkdir svn://localhost/test_android/branches
svn mkdir svn://localhost/test_android/tags
만들때마다 wq! 누르고
c 로 커밋해줘라 ^^

서버는 끝 ^^;

클라이언트 : 안드로이드ADT 에서 HELP -> new install ...... -> add ->
http://subclipse.tigris.org/update_1.8.x/ 추가 하자.
그럼 체크 박스 두개 나온다 다 check 및 finish;

open perspective  ~~~ button ~ 클릭하고 ~~


svn Repository Exploring 추가한다.

그럼 왼쪽 레파지토리에 마우스를 우측 눌러서
new 하고 레파지토리 클릭후 주소 svn://도메인/test_android
아까 썼던 아이디 comefeel 과 1234를 누르면
드디어 레파지토리에 뜬다!
체크 아웃하고 디렉토리 하나씩 몽땅 잡아서 올리자!
그리고 bin 파일 같은 -_- 것들은 제외 시켜야 올바르지 않겠는가?

올라간 레파지토리에서 직접 bin 디렉토리를 delete click 후에
해당 디렉토리 checkout 클릭한다.
그리고 이제 자바분류로 가서 해당 디렉토리 우측 버튼 누르면
add to svn:ignore.. 이 뜬다.
이버튼 누르면 이제 영영 bin은 업로드 안한다 ^^.


아 이거 쓰는데도 30분 걸리네 ㅡㅡ;; 간단하게 이미지 없이 한건데도...
여튼 정보 글쓰는 모든 블로거들은 존중받아야 된다.
난 제외한다.. 난 쓰레기니깐 .

svn  으로 팀워크를 잘해보자.


2014/02/10 23:06 2014/02/10 23:06
이 글에는 트랙백을 보낼 수 없습니다
추억이 새록새록 난다 ... 하아 ....

#include "stdafx.h"
#include <stdio.h>
#include <stdlib.h>
#include <string.h>

#define PI 3.141592;

// pointerFuntion 준말
typedef void (*pF)(char *str);

void act_1( char *str )
{
        int intValue = 0;
        printf("거리 입력 ? (킬로미터) ");
        scanf("%d", &intValue);
        printf("%d킬로미터는 %f마일입니다.\n" , intValue , (float)(intValue / 1.609344));

    return;
}

void act_2( char *str )
{
        int intValue = 0;
        float area, dulre;
        printf("반지름 ? ");
        scanf("%d", &intValue);
        area= intValue * intValue * PI;
        dulre= 2 * intValue * PI;
        printf("반지름이 %d인 원의 둘레 : %f\n" , intValue , dulre);
        printf("반지름이 %d인 원의 넓이 : %f\n" , intValue , area);

    return;
}

void act_3( char *str )
{
        int maxValue , intValueArray[3];
        for(int i = 0;i < 3;i++)
        {
            printf("%d번째 값을 입력해주세요. " , (i+1));
            scanf("%d", &intValueArray[i]);
        }

        // 삼항연산자 이용.
        maxValue = intValueArray[0] > intValueArray[1] ? intValueArray[0] : intValueArray[1];
        maxValue = maxValue > intValueArray[2] ? maxValue : intValueArray[2];
        
        printf("세가지( %d , %d , %d )중에서 제일큰 값은 %d입니다.\n" , intValueArray[0] , intValueArray[1] , intValueArray[2] , maxValue);

    return;
}

void act_4( char *str )
{    
        char ch;
        float floatValue = 0;
        printf ("위에문자를 입력하세요.(P 이면 pound -> kg, K 이면 kg -> pound) ? ");
        ch = getchar();

        // 소문자로 무조건 교환
        if( 'A' <= ch && ch <= 'Z' )
            ch += 32;

        switch( ch )
        {
            case 'p' :
                printf("파운드 입력 값은 ? ");
                scanf("%f", &floatValue);
                printf("%.2f파운드는 %f킬로그램입니다.\n" , floatValue , (floatValue * 0.453592));
                break;
            case 'k' :
                printf("킬로그램 입력 값은 ? ");
                scanf("%f", &floatValue);
                printf("%.2f킬로그램은 %f파운드입니다.\n" , floatValue , (floatValue * 2.204623));
                break;
            default :
                printf ("'%c'문자열은 p 와 k 의 문자가 아닙니다.\n" , ch);
                break;
        }
        
    return;
}

// functionArray 준말
void (*fA[4])( char *str) = {act_1 , act_2 , act_3 , act_4};

// functionExcute 준말
pF fE(int i)
{
    return fA[i];
}

void main(void)
{
        int form = 0;
        char ch;
    
        printf ("====== 다음중 계산식을 고르시오 =====\n\n");
        printf ("1. 킬로미터 => 마일 계산\n");
        printf ("2. 반지름 => 원의 둘레,넓이 계산\n");
        printf ("3. 세가지의 숫자중 큰값 계산\n");
        printf ("4. 킬로그람 => 파운드 또는 파운드 => 킬로그람 계산\n\n");
        printf ("위에 숫자중 계산하고 싶은 항목을 고르시오 (숫자하나) ");

        ch = getchar();
        fflush(stdin); // 개행문자 비우기. 또는 getchar() 한번더 실행해도 된다.
        form = (int)ch - 48; // 48을 빼주는 이유는 숫자의 기본 캐릭터 코드 넘버가 숫자 + 48이기 때문.
        if(!( form > 0 && form <= 4 ))
        {
            printf("숫자 5이상 입력하지마시오.\n실행이 종료됩니다.\n");
            system("pause");
            return;
        }
 
        fE(--form)("test");
        system("pause");

    return;    

}
2013/05/15 17:48 2013/05/15 17:48
이 글에는 트랙백을 보낼 수 없습니다
기본적으로 64비트 우분투에서 32비트 컴파일 하면...

gcc -m32 -o 32bittest test.c
실행하면 아래와 같은 오류 메세지 ㅠㅠ

In file included from /usr/include/stdio.h:28:0,
>             from test.c:1:
> /usr/include/features.h:323:26: fatal error: bits/predefs.h: No such file or directory
> compilation terminated.
그러므로 우리는

$ sudo apt-get install libc6-dev-i386
설치해주면 잘 컴파일 된다 ^^;
2013/02/02 00:46 2013/02/02 00:46
이 글에는 트랙백을 보낼 수 없습니다

VS 2010 에서 ATL 프로젝트로 만들어서
Cstring 쓰는데 char 변환할려고 하니짜증나는 코드들이많아

걍 만듬..

char* CstringToChar(CString Cstr)
{  
 char *charBuffer = (char *)malloc(Cstr.GetLength() * sizeof(char));
 sprintf_s(charBuffer, (Cstr.GetLength()+1) * sizeof(char), "%S", (char*)(LPCTSTR)Cstr);

 return charBuffer;
}

2011/04/22 14:06 2011/04/22 14:06
이 글에는 트랙백을 보낼 수 없습니다
어셈블리 인증 때문에 컴파일은 정상적으로 이루어지나,  MSB3073 오류 가 발생하는 것은

MSRDS 2008을 설치 하면 어셈블리 인증에 필요한 key 파일(mrisamples.snk)이  

\Microsoft Robotics Dev Studio 2008\samples 에 mrisamples.snk이 자동 위치해 있다.

samples 폴더 밑에 있는 mrisamples.snk를 다음의 경로에 옮겨 놓자.

\Microsoft Robotics Dev Studio 2008\bin

그리고 Properties에서 mrisamples.snk의 경로를 지정해 주자.

2011/01/07 11:36 2011/01/07 11:36
이 글에는 트랙백을 보낼 수 없습니다

최저 20기가(20기가 이하는 설정하더라도 resize버튼이 활성화 되지 않습니다.) 최대 4테라바이트까지 줄이거나 늘릴 수 있습니다.

Dynamic과 Fixed로 타입을 정할 수 있고, 용량을 설정할 수 있습니다.

Dynamic(동적)은 VHD의 사용용량만큼만 사용해서 파일로 존재하다가 마운트 및 부팅 시 최대용량으로 동작하는 것이고, Fixed(고정)은 VHD의 실 사용용량과는 별개로 전체용량으로 항상 존재하게 하는 방법입니다.

일반적인 VHD를 생성해서 사용할 때는 상관없지만, VHD형태로 배포되는 파일의 최대용량을 줄일 수 있는 유용한 유틸입니다.


2010/12/15 16:41 2010/12/15 16:41
이 글에는 트랙백을 보낼 수 없습니다
웅쓰:웅자의 상상플러스
웅자의 상상플러스
전체 (379)
게임 (5)
영화 (2)
기타 (23)
맛집 (5)
영어 (2)
대수학 (3)
형태소 (5)
Hacking (9)
Linux (112)
HTML (48)
Application_developing (48)
Web_developing (102)
Window (11)
«   2024/12   »
1 2 3 4 5 6 7
8 9 10 11 12 13 14
15 16 17 18 19 20 21
22 23 24 25 26 27 28
29 30 31        
  1. 2016/01 (1)
  2. 2015/12 (3)
  3. 2015/10 (3)
  4. 2015/03 (2)
  5. 2015/01 (4)